2/03/03
February already and things are rolling along. Still a lot to do but we are getting down to marking tasks
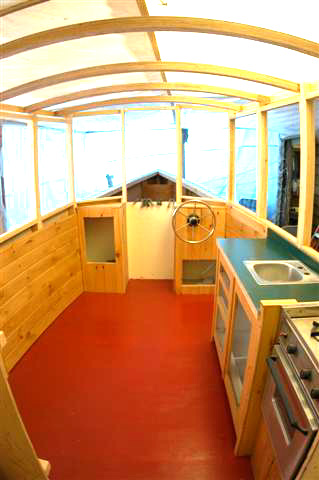
off the list as we go. We spent the weekend getting the floor painted in the forward cabin. It's red!! A little brighter than
we wanted but we will have carpets to tone it down. It adds a bit of a homebuilt feel. We may change it later but for now
it's red. Put in the bulkhead for the fridge and epoxied in all the side panels on the outside of the cabin. We were waiting
for this last bulkhead to go in before we put on the panels but now they are in for good. We were not sure which fridge unit
we were going to use and we wanted to make sure it would fit thru the back door before we limited our options. I've heard
of guys building a boat in the basement only to find out the boat is bigger than the door. Didn't want to be in that group...................
2/10/03
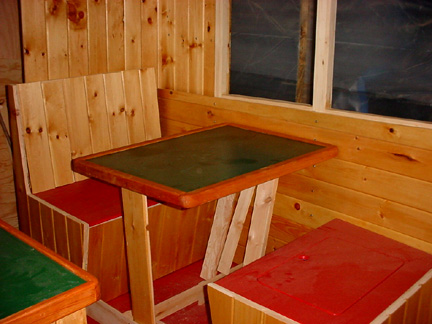
Spent Friday and Sunday making and staining the drawers for the galley and putting in the booth. The booth
will give us an extra place for someone to sleep with the table folded down. I should have it done this week. I'm still trying
to figure out how to make the forward seat both front and rear facing by moving the backrest one way or the other. It would
be nice to sit on a 4" foam cushion while under way. I don't know how much the boat will pound but the extra foam in the seat
should help. No picture this week as there is not much noticable change. I'll post one next week when the booth is done. The
little details take a lot of time with little to show for it.
2/12/03
Just got back from the lumber yard. I went ahead
and ordered 100 board feet or Honduran Mahogany. Pricey stuff but it will make the decks look nice. I will start on the window
frames and a lot of the finish trim inside the cabin as soon as I get the mahogany. I need to get the cleats on the deck,
which has to be done before the interior paneling is put in for good so I can put the shelves in the galley cabinet. It seems
like everything has a time and place in the construction of boats. I'm looking forward to working with a hardwood for a change.
2/23/03
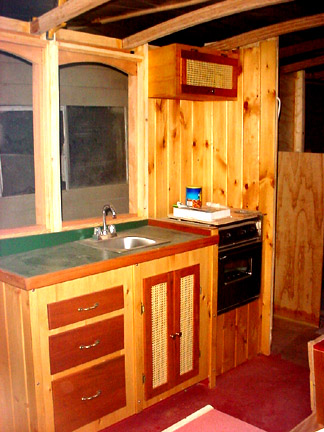
The mahogany came in and we spent the last several days making trim and finishing the table top and the fronts
for all the cabinets. I also put together the cabinet over the stove. The door fronts still need the caneing put in after
we get done varnishing them. We finished framing out the booth and painted the inside and seat tops. We will make the cushions
later. It's on to the window frames next.
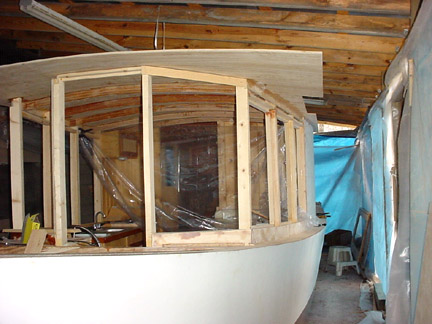
3/3/03
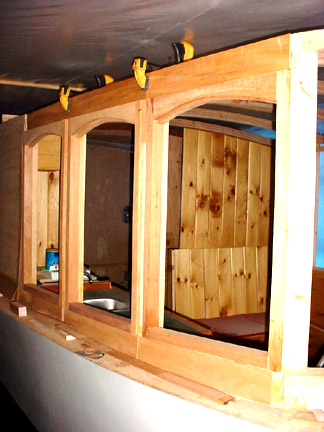
I took a couple days off work to get some things done on the boat.
I managed to make a small pile of windows out of a big pile of mahoagny. We got all the canning in the doors to the galley
and lack gluing the windows together to finish them. The picture is of the window detail. I'm going to finish all the wood
in and around the windows in bright mahogany like a lot of the old boats were done. I'll use plexiglass in the sides and laminated
glass in the front windows so I can use a windshield wiper.Things should move along quicker now that a lot of the detail work
in the cabin has been completed. I wish Spring would get here so we can get the roof on and the outside of the boat epoxied
and painted. I find it easy to switch from one part of building to another and it keeps me interested this way. If I get tired
of working on windows, I work on cabinets or wiring.
3/10/03
Finished up the floor of the booth this week. It will
be red to match the cabin floor. We took a rare Sunday off to chase boat parts in Charlotte. After 90+ hours working on the
boat in February I just needed a break and the weather was great for a drive in the car. I think I have most of the wiring
I need and should be working on that this week. We were given another piece of the canning for the doors from Jason and Carol
Raines so we should get all the cabin doors to match now. There should be a lot happening to the boat in the next several
weeks. Stay tuned...........
3/17/03
Spent 3 working days getting over a stomach virus and didn't get as much done
on the boat as I would have liked. Hopefully all the pain will give me some imunity next time. I did get some more of the
windows sanded and ready for varnish and started trimming the roof line in preperation for putting the ply on. I should have
a picture up later this week if all goes well.
3/23/03
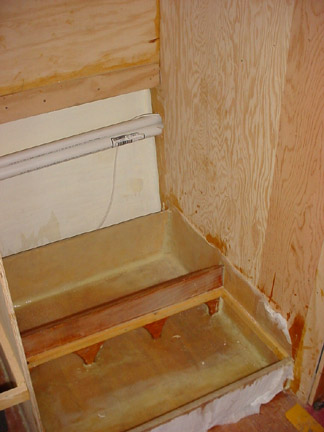
Nothing like warm weather to get the old boat blood going. We got a lot done this weekend. I finally got tired of
working in a plastic room so we took down the liner so as to be able to put on the roof after working all winter without one.
It's dark in the cabin now. I will need to hook up some lighting in the cabin to see what we are doing. I also got started
on the holding tank for the head. The picture shows the bi-level tank without the top plates. We should be able to hold about
25-30 gallons between pump outs. We are using a simple unit found in top of the line motor homes. There will be no need for
a macerator pump and associated maintance and wiring since the head sits atop the tank. The tank will be vented thru the roof
and should work great. We also picked up all the plywood for the rear deck so hopefully I can get the fuel tank in and start
the lockers in the back. I think we are wearing out the floor in the back cockpit from all the trips over the transom to get
stuff out of the shop.
A note about tools if you should decided to build a boat: It seems like to do any job on the boat requires at least
8-10 different tools. Some days I use them all. The table saw is the most used tool on a plywood boat. Buy the best you can
afford. I use a Dewalt portable contractor model and it has the best rack and pinion fence I could find. The second most important
tool is the battery screwdriver/drill. I'm on my second Dewalt. Square drive stainless steel screws are the only ones we use
now. I've found that a hand held portable grinder with a 36 grit wheel will take away wood faster than the belt sander but
be careful as it will also take away skin and denim as well. We go thru boxes of latex rubber gloves. We always put on two
pair so when the outer ones get epoxy on them we can pull them off and still have a clean pair underneath. We make our
own notched epoxy trowels out of plastic paddles like the ones used in the auto body shops. I cut the notches on the table
saw and get a nice pattern of ridges when I put on the thickened epoxy on laminations. I have also found that when you put
two pieces of ply together with a butt block over the seam it helps to drill some small holes along the seam to let the epoxy
and any trapped air to escape. The epoxy that pushes up thru the holes not only seals the holes but acts like epoxy nails
between the two peices. It's all going to be covered with fabric anyways so I don't worry about leaks. I'll cover more about
my tools next month with tips on the ones I like and the ones I would not buy again.